;)
;)
;)
Rules Engine Customization
Collaboration in Centric CRM is typically achieved through Action Plans, Assignments, Ownership and Workflows.
Every time a user inserts, updates, or deletes data in Centric CRM, a component-based multi-threaded rules engine is triggered. Events are handled in the background exposing the object before and after it was modified. This can be used for creating an account history item for the selected object, executing a workflow, indexing data, and more, allowing complete customization of an Organization's business processes.
Example Workflow
The following default process occurs every time a ticket is inserted or updated in Centric CRM. The workflow is designed using Centric CRM Action Components and Condition Components. These components are included with Centric CRM. Developers can completely modify this workflow, and others, by changing rules, properties and adding custom components to do just about anything.
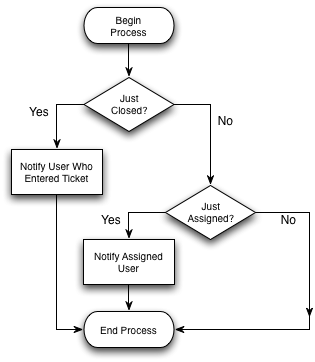
See Creating Workflows to understand the terminology and construction of a workflow and its components. When designing a workflow, it's often best to start with a diagramming tool and create visual flowcharts of the Organization's processes.
Deploying a workflow
Deploying a Workflow using existing Workflow Components:
- Provide the workflow.xml file to a Centric CRM administrator
- The administrator navigates to the Admin module, then chooses Configure System, then chooses Business Process Management
- The administration then uploads the new workflow, optionally replacing any existing workflows -- the default will append the workflows
- A success message indicates the processes were added
Deploying a Workflow using new components:
- Package up the custom workflow components into a .jar
- Copy the .jar into Centric CRM's fileLibrary for backup (a future update will automate deploying these)
- Copy the .jar into Centric CRM's webapp/WEB-INF/lib directory
- Restart the Web Application Server
- Register the custom components with the Centric CRM database (to be documented)
- Provide the workflow.xml file to a Centric CRM administrator
- The administrator navigates to the Admin module, then chooses Configure System, then chooses Business Process Management
- The administration then uploads the new workflow, optionally replacing any existing workflows -- the default will append the workflows
- A success message indicates the processes were added
Sign in to add your comment.